When a customer is presented with an elongated or flat food sample, one of the first things they might do is snap it between their hands.
During this process, they are subconsciously assessing whether the food product is brittle or ductile, stiff or compliant, and strong or weak. Consequently, bend testing is a technique used very frequently by Texture Analyser users, covering everything from the snap of tablets to the toughness of dog chews.The analysis of this type of testing is often limited to looking at a force peak and maybe the distance to fracture. It is a very useful test for monitoring quality of irregular objects. However, this test setup can also provide useful stress-strain data if the sample has a uniform cross-section, providing accurate measurements are made of the sample dimensions. “Flexure” and “bending” have the same meaning and are often used interchangeably.
Three point bend testing
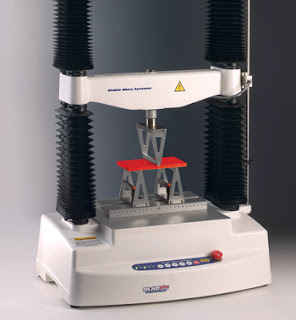
Three point bend testing is the most commonly used set up, and so it will be discussed here. It involves a long sample being placed on two supports (or “rollers” – named due to their curved surface) a set distance apart, with a third roller moving down to contact the sample halfway between these supports. The loading arm moves down at a constant speed to bend the sample, first deforming it elastically then plastically. If the sample is sufficiently brittle and the force required within the limit of the load cell, fracture will occur.Although the loading arm is moving down towards the sample, this is not solely a compressive (or tensile) test – when an object is bent, part of it is compressed and the other part put in tension. (There is also a plane between these sections that is not stretched or compressed, called the neutral surface.)
During the test, the force applied, the distance moved by the probe and the time are all recorded in Exponent. The force-distance graph usually begins with a straight section that corresponds to elastic (reversible) deformation, then most samples show a curved section that shows plastic (irreversible) deformation. Different samples will give different load-distance responses – stronger and stiffer samples show higher forces, brittle samples break before any plastic deformation occurs and tough samples show a large area under the curve corresponding to a large amount of energy required for deformation.
The points on the sample that have the highest stress applied are the top and bottom surfaces at the loading point B, and this is where the sample is most likely to fail.
Due to the often elongated nature of bend test samples, bend testing is frequently used along with, or instead of, tensile testing, as both tests suit similar samples. Bend testing has some advantages over tensile testing. Firstly, samples can be any elongated shape providing the cross section is constant between the rollers (tensile specimens often have to be made thinner in a central section to encourage fracture away from the grips). The test itself is simpler to set up, as there is no ambiguity over taring the force before the test (this can be a problem with tensile testing as the grips are connected via the sample before the test has even begun, and there will always be some pre-tension, no matter how small).
However, the stress configuration of a bent sample is much more complicated than one in tension, and the analysis is consequently more difficult. Due to this complex stress state, the sample orientation also has a much larger influence in bend testing.
This difference in stress state also has a bearing on the strength of the sample in question – this may or may not be an advantage. Every part of a sample in tension is under the same stress, and so failure will initiate when the weakest area (perhaps at a crack or void) reaches its limiting tensile stress. When a sample is under flexure, only the outermost fibres are at the highest stress. If there are no defects in this outer layer, the flexural strength will be controlled by the strength of these extreme fibres and the strength will be higher.
If there were no defects at all (a perfectly homogeneous sample), the flexural and tensile strengths of the sample would be the same. However, this is not common in practice as most materials have voids, cracks or other defects that cause a stress concentration, weakening the sample in a local area. As such, for the same material, bending strengths are generally higher than tensile strengths. In some more unusual cases, if a sample has a surface with a large number of flaws (due to rust spots or scratches), this will cause the tensile strength to be higher than the bending strength.
There are no set limitations to the type of material that may be investigated using three point bend testing. It is inadvisable to test thick sections of very stiff materials, however, as although Texture Analysers have a very low frame compliance, it is disadvantageous to test a sample of such high stiffness that movement of the instrument itself might be perceived as sample deflection. The problem may be avoided if the sample thickness and depth are reduced.
On the other hand, this type of testing can only be used on self-supporting samples (that do not deform under their own weight). For example, a bandage or a liquorice lace will fall down in the middle when placed on the rollers unless it is clamped, and then a true bend test is no longer taking place. Tensile testing is necessary for these samples.
Bend testing is very useful for the characterisation of ceramics and brittle food materials, as already having a lower toughness, their strength is more strongly limited by the size and placement of flaws. A tensile test would expose the whole sample to the maximum stress, making it more likely that a flaw becomes critical and initiates fracture under a given load.
Consequently, the reduction of tensile strength compared to bending strength mentioned above becomes magnified for these brittle materials. Additionally, trying to hold a brittle material in a set of tensile grips can itself be a challenge, and this causes a stress concentration that makes it difficult to encourage fracture away from the grips during the test. Bend testing simply involves the placement of a brittle sample on the rollers.
The main measurement that can be taken from a three point bend test is the flexural stress-strain response. From this, the flexural modulus can be calculated from the initial gradient of the graph. The ‘strength’ of the sample is usually taken to be the highest force (and highest stress) on the force-distance graph.
This analysis calculates several useful parameters from a three point bend graph, using the standard engineering equations for stress and strain of a beam undergoing three point bending. The sample dimensions required are shown in the following diagrams using specimens with a rectangular and circular cross-sections as examples:
As long as the cross-section is uniform, any shape may be tested in this way. If this is the case, more general beam bending equations must be used to take the shape of the cross-section into account by use of its “second moment of area”, which describes how the sample’s mass is distributed about its bending axis.
There is a wealth of information in the literature on this topic, and the equations for most cross-sectional geometries can be found in engineering texts. The necessary equations for rectangular and circular cross-sections are summarised here. Units given are based on force in Newtons and distance in metres.
The “flexural stress” and “flexural strain” are the values for stress and strain at the outermost fibres – top and bottom surfaces – and they depend on the force applied by the Texture Analyser and the distance the probe has moved as well as the sample geometry.
For a sample with a rectangular cross-section, these quantities are given by:
For a sample with a circular cross-section, these quantities are given by:
Stress is measured in Pascals and strain has no units.
These calculations depend strongly on the sample width and height as well as the gap between the supports. The support gap is very easy to control as it can be measured accurately once then set to remain the same for each test.
The sample dimensions are best measured using digital calipers, taking three measurements along the length of the sample and calculating the average. The smaller the sample, the higher the possibility of error. However, bending tests are best suited to long, thin specimens, and the sample dimensions are sometimes not easy to control.
If the Generate Curve function is used in an Exponent macro along with these equations, the y axis can be set to flexural stress and the x axis to flexural strain. Once this has been done, the resulting stress-strain curve enables simple calculation of several parameters:
1) Flexural modulus – the gradient of the initial linear section of the stress-strain graph (Pascals).
2) Yield stress – the stress at which the gradient of the graph first begins to drop. It is the end of the linear section and the first sign of plastic deformation (Pascals). (Yield stress can only be located if there is a linear section followed by a clear decrease, and it will be more accurately located if the data acquisition rate is high.)
3) Ultimate flexural stress – the highest stress reached before fracture (or before the stress tails off if the sample does not fracture) (Pascals).
4) Toughness – the total area under the stress-strain graph (Pascals, although the equivalent J/m3 is more often used). Toughness is strictly the energy to failure, but if the samples do not fracture, the toughness to a specific displacement can be used as comparison. It is common for non-brittle samples to deform but not break in a bend test.
These equations, based on simple beam theory, are only suitable for small deflections and are technically only applicable to elastic deformation, so the flexural stress will be inaccurate once the beam has yielded. However, an improvement would involve the use of either complex maths or computer modelling, both of which are time-consuming and potentially expensive. The beam bending equations can be used for the full behaviour of the beam as long as they are used in the knowledge that they are an approximation, albeit a close one.
The fracture behaviour of samples is often investigated using bend testing by putting a notch of known size and shape in bend specimens before the test. This requires the use of fracture mechanics equations and some further reading, but it is fully possible to perform on a Texture Analyser.
There is a Texture Analysis test for virtually any physical property. Contact Stable Micro Systems today to learn more about our full range of solutions.
For more information on how to measure texture, please visit the Texture Analysis Properties section on our website.
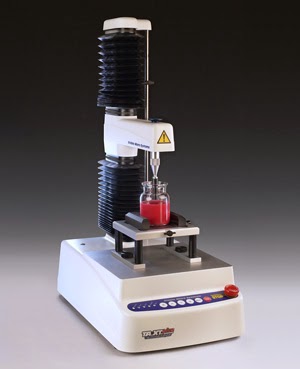
 The TA.XTplus texture analyser is part of a family of texture analysis instruments and equipment from Stable Micro Systems. An extensive portfolio of specialist attachments is
available to measure and analyse the textural properties of a huge range of
food products. Our technical experts
can also custom design instrument fixtures according to individual
specifications.
The TA.XTplus texture analyser is part of a family of texture analysis instruments and equipment from Stable Micro Systems. An extensive portfolio of specialist attachments is
available to measure and analyse the textural properties of a huge range of
food products. Our technical experts
can also custom design instrument fixtures according to individual
specifications.No-one understands texture analysis like we do!
To discuss your specific test requirements click here...
 |  |  |


No comments:
Post a Comment