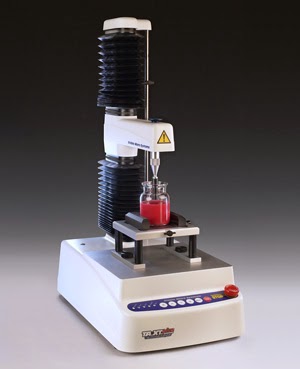
The loading arm (attached to the probe) moves down at a constant speed to deform the sample, first deforming it elastically then plastically (if it is not completely brittle). If the force required to break the sample is within the limit of the load cell, fracture may occur. However, this is not always the case in compression as many samples are stronger (or tougher) in compression than in tension, especially ceramic samples.
It is a very useful test for monitoring the quality of irregular objects, such as the compressive strength of many foods (which gives a good idea of their perceived hardness upon eating). However, this test setup can also provide useful stress-strain data if the sample has a uniform cross-section, providing accurate measurements are made of the sample dimensions.
Compression testing using a Texture Analyser
During the test, the force applied, the distance moved by the probe and the time are all recorded in Exponent. The force-distance graph usually begins with a straight section that corresponds to elastic (reversible) deformation, then most samples show a curved section that shows plastic (irreversible) deformation. Different samples will give different load-distance responses – stronger and stiffer samples show higher forces, brittle samples break before any plastic deformation occurs and tough samples show a large area under the curve corresponding to a large amount of energy required for deformation. Depending on the nature of the sample it will show some or all of the characteristics of the stress-strain graph below. Different materials show very varied graph shapes.In a tensile test, necking often occurs (an unstable region of narrowing cross-section at a stress concentrator in the sample). On the other hand, in a compressive test, samples tend to bulge at the sides and become barrel shaped. With increasing load, the cross-sectional area increases due to this effect, which causes the stress to increase at a high rate. This may be considered as the opposite effect of necking. This effect occurs due to the friction between the probe or machine base and the sample. Lubrication is often used to reduce this effect.
Commonly Used Parameters
These parameters may all have values different from those expected from the same sample tested under tension (although Young’s modulus is generally the same for either test type). Breaking strain and energy to failure are excluded from the list as many samples do not break under compression – very plastic samples tend to flatten with increasing stress. As mentioned above, stress values at a given strain under compression are usually higher than they would be in tension.
1) Yield stress – the stress at which the sample begins to deform plastically (permanently). It is defined as the end of the linear section. Yield stress can only be located if there is a linear section then a clear gradient decrease, and it will be more accurate if there are more points collected per second.
2) 0.2% proof stress – when a yield point is not easily defined based on the shape of the stress-strain curve an offset yield point is arbitrarily defined. This is set as 0.2% plastic strain. It is found by drawing a line from 0.2% strain parallel to the linear section.
A hard material has a high yield stress (and high 0.2% proof stress).
3) Young’s modulus – the stiffness of the sample – its resistance to elastic deformation. It is measured as the slope of the initial linear section of the stress-strain graph.
A stiff material has a high Young’s modulus. Some materials (such as rubber, as it is viscoelastic) cannot be said to have a Young’s modulus as they show no linear elastic behaviour).
4) Maximum stress – the maximum stress exerted on the sample during the test.
Some materials break very sharply, without plastic deformation, in what is called a brittle failure. Others, which are more malleable, including most metals and polymers, experience some plastic deformation.
A strong material has a high maximum stress.
5) Strain at maximum stress – the strain at the maximum stress value. Malleable materials tend to show larger strains in compression.
6) Energy to the maximum stress - this is the energy used to deform a sample and is measured as the area under the graph. The larger the area, the tougher the material. Toughness is strictly the energy to failure, but if the samples do not break, the ‘toughness’ to a specific strain can also be used as comparison. If a sample is very malleable (such as a soft food sample) it may not break at all.
There is a Texture Analysis test for virtually any physical property. Contact Stable Micro Systems today to learn more about our full range of solutions.
For more information on how to measure texture, please visit the Texture Analysis Properties section on our website.
 The TA.XTplus texture analyser is part of a family of texture analysis instruments and equipment from Stable Micro Systems. An extensive portfolio of specialist attachments is
available to measure and analyse the textural properties of a huge range of
food products. Our technical experts
can also custom design instrument fixtures according to individual
specifications.
The TA.XTplus texture analyser is part of a family of texture analysis instruments and equipment from Stable Micro Systems. An extensive portfolio of specialist attachments is
available to measure and analyse the textural properties of a huge range of
food products. Our technical experts
can also custom design instrument fixtures according to individual
specifications.No-one understands texture analysis like we do!
To discuss your specific test requirements click here...
 |  |  |


No comments:
Post a Comment