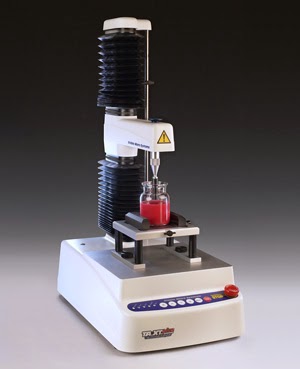
Tensile testing involves a sample held in two grips a set distance apart. The loading arm (attached to the top grip) moves up at a constant speed to deform the sample, first deforming it elastically then plastically. If the force required to break the sample is within the limit of the load cell, fracture will occur.
It is a very useful test for monitoring quality of irregular objects, such as the toughness of pizza or the texture of fish. However, this test setup can also provide useful stress-strain data if the sample has a uniform cross-section, providing accurate measurements are made of the sample’s dimensions. “Dogbone” shaped specimens are often used in tension, with two wide sections tapering to a narrower central section.
This central section has a uniform cross-section. These specimens are designed to encourage deformation away from the grips and into the central section in a controlled manner. Dogbone specimens are not mandatory, however. As long as the sample has a uniform cross-section, is long enough to grip properly and does not break off at the grips, it will be suitable for tensile testing.
Tensile testing on a Texture Analyser
During the test, the force applied, the distance moved by the probe and the time are all recorded in Exponent. The force-distance graph usually begins with a straight section that corresponds to elastic (reversible) deformation, then most samples show a curved section that shows plastic (irreversible) deformation. Different samples will give different load-distance responses – stronger and stiffer samples show higher forces, brittle samples break before any plastic deformation occurs and tough samples show a large area under the curve corresponding to a large amount of energy required for deformation.Depending on the nature of the sample it will show some or all of the characteristics of the stress-strain graph below. Different materials show very varied graph shapes. Several useful parameters can be calculated from a tensile stress-strain graph, using the standard engineering equations for stress and strain of a beam undergoing tension. If force is measured in Newtons and distance in metres, stress has units of Pascals and strain has no units (it is a ratio).
For example, for the specimen with a rectangular cross-section in the diagram above, the stress would be given by:
As the area of the rectangular cross section is simply the sides multiplied together.
Samples are not always rectangular in cross-section – cylindrical specimens are also very widely-used. The calculations need to be adjusted for the change in cross-sectional area if this is the case. Round tensile dog-bones are a common geometry for metal tensile testing whereas flat dog bones are more common for plastics. Samples with a cross-section of an irregular shape may have their cross-sectional area calculated by other means.
Once the y axis has been changed to show stress and the x axis strain, the resultant stress-strain curve can be used for the following analysis. This can be achieved automatically in Exponent as long as the sample’s stress area has been input into the software. The more accurate this measurement, the more accurate the stress data. For help with macro writing, please contact a member of Stable Micro Systems' technical staff.
Commonly Used Parameters
1) Yield stress – the stress at which the sample begins to deform plastically (permanently). It is defined as the end of the linear section. Yield stress can only be located if there is a linear section then a clear gradient decrease, and it will be more accurate if there are more points collected per second.
2) 0.2% proof stress - when a yield point is not easily defined based on the shape of the stress-strain curve an offset yield point is arbitrarily defined. This is set as 0.2% plastic strain. It is found by drawing a line from 0.2% strain parallel to the linear section.
A hard material has a high yield stress (and high 0.2% proof stress).
3) Young’s modulus – the stiffness of the sample – its resistance to elastic deformation. It is measured as the slope of the initial linear section of the stress-strain graph.
A stiff material has a high Young’s modulus. Some materials (such as rubber, as it is highly viscoelastic) cannot be said to have a Young’s modulus as they show no linear elastic behaviour.
4) Ultimate tensile strength – the maximum stress that a material can withstand while being stretched before breaking. It is the highest stress value on a tensile stress-strain graph. Some materials break very sharply, without plastic deformation, in what is called a brittle failure. Others, which are more ductile, including most metals, experience some plastic deformation and possibly necking before fracture. Necking is the appearance of a thinning section during a tensile test, brought about by a stress concentration.
A strong material has a high ultimate tensile strength.
5) Breaking strain – the strain at the point of fracture.
A ductile material has a high breaking strain.
6) Energy to failure – also known as toughness or strain energy. This is the energy used to break a sample and is measured as the area under the graph. The larger the area, the tougher the material.
NB. Toughness is strictly the energy to failure, but if the samples do not break, the ‘toughness’ to a specific strain can be used as comparison. If a sample is very ductile (such as plastic film) it may not break within the span of the loading arm.
7) Strain rate – the deformation of many materials depends strongly on strain rate, as the processes that allow deformation to occur are time dependent. The strain rate of a test can be calculated from the gradient of the strain – time graph.
8) Resilience – resilience is the ability of a material to absorb energy when it is deformed elastically, and release that energy upon unloading. The modulus of resilience is the energy that can be absorbed per unit volume without creating a permanent distortion. It is equal to the area of the stress-strain curve from zero to the elastic limit.
9) Strain to yield – the strain value at the yield stress.
Other Useful Parameters
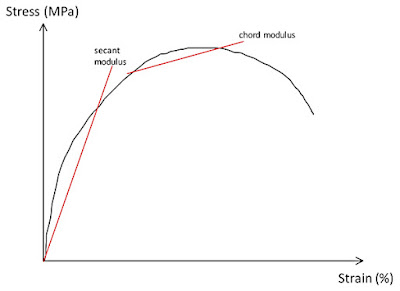
Chord, Secant and Tangent moduli
The value of Young's modulus is a material property useful for calculating the compliance of structural materials that follow Hooke's law when subjected to uniaxial loading (that is, the strain is proportional to the applied force). But for materials that follow nonlinear elastic stress-strain behaviour, the values of tangent, secant or chord moduli are useful in estimating the change in strain for a specified stress range.
10) ‘Tangent modulus’ is the slope of the curve at any point.
11) ‘Initial tangent modulus’ is the slope drawn from the origin.
12) ‘Chord modulus’ is the slope of the line between any two strains on the curve.
13) ‘Secant modulus’ is the line from the origin to any strain.
There is a Texture Analysis test for virtually any physical property. Contact Stable Micro Systems today to learn more about our full range of solutions.
For more information on how to measure texture, please visit the Texture Analysis Properties section on our website.
 The TA.XTplus texture analyser is part of a family of texture analysis instruments and equipment from Stable Micro Systems. An extensive portfolio of specialist attachments is
available to measure and analyse the textural properties of a huge range of
food products. Our technical experts
can also custom design instrument fixtures according to individual
specifications.
The TA.XTplus texture analyser is part of a family of texture analysis instruments and equipment from Stable Micro Systems. An extensive portfolio of specialist attachments is
available to measure and analyse the textural properties of a huge range of
food products. Our technical experts
can also custom design instrument fixtures according to individual
specifications.No-one understands texture analysis like we do!
To discuss your specific test requirements click here...
 |  |  |


No comments:
Post a Comment