 Although
it has long been known that some materials are harder than others,
indentation tests to find quantitative hardness values only came about
in the 1800s.
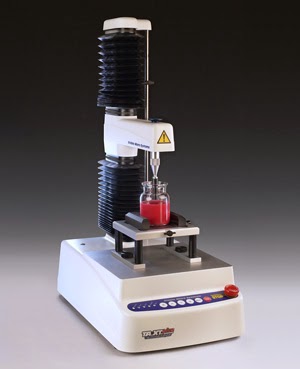
 Once it was established as a valuable technique, hardness testing machines started to appear on the market early in the following century. Old fashioned indentation testing involved the application of a weighted probe onto a flat sample surface that was left for a set time period. The hardness of the sample was calculated from the area of the residual dent left in the sample. “Instrumented” (computer controlled) indentation testing has now been in use for many years, and involves the collection of force, displacement and time data, which is why the Texture Analyser is so well-suited to this type of measurement.
It is a very useful test for monitoring the quality of irregular objects (such as the firmness of apples at different temperatures) by simply indenting to a set distance and looking at the force peak. However, this test setup can also provide some more fundamental parameters if the sample has a flat surface and a homogeneous structure, providing accurate measurements are made during the test.
Indentation tests on a Texture Analyser
During an indentation test, the loading arm moves down at a constant speed, pushing the probe into the sample until it reaches a set force or distance. This force (or distance) is held for a given time period and the probe withdraws from the sample surface at a second constant speed. A residual imprint of the indenter is left behind in the sample, which corresponds to the amount of plastic deformation that took place. The majority of elastic deformation is released as the probe withdraws from the sample.The advent of microindentation and nanoindentation have caused the publication of a vast amount of information on indentation analysis techniques, and the basic principles will be loosely applied here. A great deal of information can be gained by following through analyses such as those by Oliver and Pharr.
Micro- and nanoindentation are primarily used for testing metals, often down to depths so small that the movement of individual atomic mechanisms can be observed during the test. Fortunately for food, cosmetics or even pharmaceutical testing, many of the difficulties caused by nanoindentation tests do not apply to the large scale (several mm depth) tests that are the most suitable for these samples. Sample preparation is much simpler – a flat surface is all that is required – and samples are available in larger quantities than experimental materials. Tiny thermal fluctuations that have a catastrophic effect in nanoindentation are unnoticeable on larger scales.
Nanoscale properties are not often important in these industries, so small scale microstructures do not have to be investigated. Additionally, the blunting of the probe tip after a lot of use does not have such a great impact on accuracy as it does on the nano- or microscale. Whereas in nanoindentation an accurate function of the tip’s area must regularly be plotted using separate tests, the area used in large scale testing can simply use the standard equation for the cross-sectional area of a cone or sphere, which varies with the depth indented into the surface.
Finally, the stiffness measurement taken from the initial unloading gradient is more reliable when the indenter is much stiffer than the sample. This is because the indenter is also put under stress, and if it is too compliant, the movement of the indenter will be larger and adversely affect the results. The indenter’s compliance can be taken account of, but for the majority of applications that will use a Texture Analyser to perform indentation (food, pharmaceutical and cosmetics industries, for instance), a stainless steel probe will be much stiffer than the sample and should not be a cause for concern.
During the test, the force applied, the distance moved by the probe and the time are all recorded in Exponent – the main data needed for full indentation analysis. There are some indentation macros built into Exponent for automatic analysis, covering some of the principles discussed here.
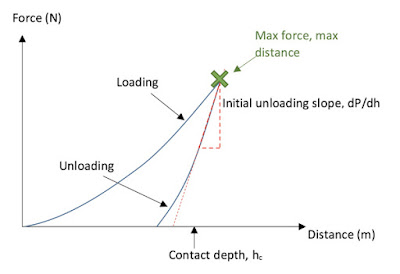
The force-distance graph is heavily influenced by several mechanical properties. Different samples will give different load-distance responses – stiffer samples show a steeper unloading line and hard samples show a greater force needed to indent to the same depth as softer samples.
On a typical indentation force-distance graph, the load increases at an increasing rate during loading (as the indenter becomes wider and its cross-sectional area increases with depth). Once the maximum force or distance has been reached, the load decreases at a decreasing rate. The distance does not return to its starting point unless the sample is perfectly elastic (which is very unusual). Several major properties can be calculated using the force-distance graph along with the probe’s projected contact area at each depth (projected means the area seen when looking at the indentation from above, not the whole contact area between the probe and the sample). For a conical indentation, the whole contact area would have a conical shape, but the projected area (of interest here) would be a circle.
As demonstrated in the above picture, the probe can pinch the sample surface in as it performs the indentation, so the actual contact depth isn’t quite as large as the point on the force-distance curve (some of the “distance” has gone into deflecting the sample downwards, like pushing down on a drum skin, rather than pushing into the surface). This can be taken account of using the following equation:
As mentioned above, the probe’s projected area at each depth can be described by its “area function”. This is simply an equation that shows how the cross-sectional area of the probe varies with depth and requires a little bit of maths. For example, for a 30° cone, this is a circle whose radius (r) depends on the indentation depth (h):
Looking at the dotted triangle, r = hc tan 15°. As the projected area is a circle, this has an area of πr2 = π*(hc tan 15°)2. So the full area function for a 30° conical indenter (the area at each contact depth, hc) is:
Stable Micro Systems currently provide conical probes of various internal angles, spherical probes of various radii and Vickers probes, and area functions can easily be calculated for each. It is important to note that although excellent for comparative hardness testing, the cylindrical penetration probes are not suitable for this type of fundamental analysis. Once the area function is known, several parameters can be calculated.
1) The main measurement that can be taken from this test is hardness. This is the ratio between the load applied and the projected contact area of the probe indented into the sample surface at that force:
The hardness units from this equation will be in N/m2, which is equal to Pascals. This is actually a “Meyer hardness” measurement, as it uses the projected area rather than the full probe-sample contact area. There are many different hardness scales currently used in industry (e.g. Mohs, Vickers, Brinell, Rockwell and Knoop). Meyer hardness can be converted to some of these scales providing the correct probe has been used, but research must be carried out before using a conversion equation. However, Exponent does have a built-in project for measuring Vickers hardness in units of VHN with the use of the Vickers probe.
2) The “reduced modulus” of the sample is a measurement of the sample’s stiffness. It is found from the following equation:
Where dP/dh is the initial unloading slope (when the elastic strain is first being relieved) and A is the projected contact area.
The reduced modulus is actually the stiffness of the contact between the sample and indenter. To calculate the Young’s modulus of the material, a calculation must be made involving the indenter’s Young’s modulus and Poisson’s ratio as well as the sample’s Poisson’s ratio. If these parameters are known, then a further macro can be written to calculate the Young’s modulus. It is likely that they are not known, so the reduced modulus is satisfactory for comparison of different samples using the same indenter. If a plastic indenter were used, for example, the results may not be comparable with those from a stainless steel indenter.
3) The plastic, elastic and total energies associated with the indentation:
plastic area = area A
elastic energy = area B
total energy = area A + area B
As with most mechanical test graphs, the total area under the graph is representative of the energy required to perform the whole test. When an indentation is performed, both plastic (permanent) and elastic (reversible) work is done. When the indenter is unloaded, the elastic work is relieved (similarly to a spring bouncing back when the load is removed). The plastic work is not relieved, and that is why an indentation is left in the sample surface. The elastic energy is given by the area under the unloading line, so the plastic energy is the difference between the total and elastic energies. These values are calculated very simply by dropping anchors at the appropriate points and using the area calculation in an Exponent macro. If the axes are set to force in Newtons and distance in metres, the area units will be Nm, which are equivalent to Joules. If any other force or distance units are used, they must be converted if Joules are required.
4) Finally, some samples have adhesive properties that may be of interest when performing an indentation. If there is visible adhesion present, it will show up as a negative region once the indenter has broken contact with the sample. The area of this region will be equal to the adhesive energy and the maximum negative force will be the adhesive force. In general, however, an indentation test is not the ideal way to measure adhesive properties due to the constant variation in contact area and load during the test, and in any case there has been a lot of research into perfecting adhesive test techniques.
Instrumented indentation is a quick and simple technique, and once the analysis procedure has been established by use of an Exponent macro, several useful parameters are calculated at the press of a button with no additional input from the user.
There is a Texture Analysis test for virtually any physical property. Contact Stable Micro Systems today to learn more about our full range of solutions.
For more information on how to measure texture, please visit the Texture Analysis Properties section on our website.
 The TA.XTplus texture analyser is part of a family of texture analysis instruments and equipment from Stable Micro Systems. An extensive portfolio of specialist attachments is
available to measure and analyse the textural properties of a huge range of
food products. Our technical experts
can also custom design instrument fixtures according to individual
specifications.
The TA.XTplus texture analyser is part of a family of texture analysis instruments and equipment from Stable Micro Systems. An extensive portfolio of specialist attachments is
available to measure and analyse the textural properties of a huge range of
food products. Our technical experts
can also custom design instrument fixtures according to individual
specifications.No-one understands texture analysis like we do!
To discuss your specific test requirements click here...
 |  |  |


No comments:
Post a Comment