 This
is a versatile test and can be applied to many types of products that
are available in, or can be cut or shaped into, elongated test beams.
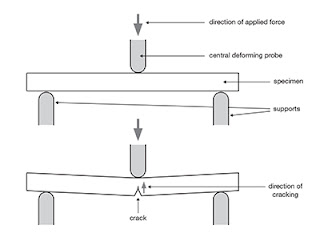
 The most conventional method is a three-point bend test in which the specimen is supported horizontally at either end like a bridge and a probe moving downwards bends it in the centre. As the specimen bends it stores up strain energy, which is dissipated in cracking at the point of fracture.
Cracking generally tends to be sudden in most materials unless the specimen has a complex morphology in which the propagating crack is stopped or deflected by the structural components of the material. Sudden snapping during a test is generally not favourable as only a fraction of the stored strain energy is used in fracture.
Slow and controlled cracking yields more reliable results and makes accurate comparisons simpler. This can be achieved by slow bending rate and notching the specimen on the underside in the middle (see diagram). In most cases, the crack initiating from the tip of the notch is much more stable.
To facilitate pure bending it is important to have a large span to depth ratio of the specimen (larger than 5). Too short a specimen leads to shear forces developing and inaccurate results.
The supports of the bend rig must be rounded so that the specimen can rotate over it as it bends. This is particularly important for very deformable materials in order to keep the distance from the point of bending to each of the end supports constant. This reduces unnecessary tensile forces developing within the specimen.
Typical force/deformation plots and measurable fracture properties:
 |
| e.g. Pretzel sticks or any other brittle or glassy material including boiled sweets etc. |
As the specimen bends it stores strain energy which eventually causes it to break. In brittle homogeneous materials this is a simple one stage process where the important point is the force and deformation at which the specimen fractures. The harder the material the higher the fracture force and stress. The more ductile the material the higher the fracture deformation or strain. The tougher the material the larger the energy.
Structurally complex materials can show micro-fracturing before the main failure occurs. Alternately the presence of voids or fibres can cause the crack to stop until more energy is supplied, e.g. crisps. These materials give a several stage profile with many peaks in the force/deformation curve, the first being crack initiation.
We can design and manufacture probes or fixtures for the TA.XTplus texture analyser that are bespoke to your sample and its specific measurement.
Once your measurement is performed, our expertise in its graphical interpretation is unparalleled. Not only can we develop the most suitable and accurate method for the testing of your sample, but we can also prepare analysis procedures that obtain the desired parameters from your curve and drop them into a spreadsheet or report designed around your requirements.
For more information on how to measure texture, please visit the Texture Analysis Properties section on our website.
 The TA.XTplus texture analyser is part of a family of texture analysis instruments and equipment from Stable Micro Systems. An extensive portfolio of specialist attachments is
available to measure and analyse the textural properties of a huge range of
food products. Our technical experts
can also custom design instrument fixtures according to individual
specifications.
The TA.XTplus texture analyser is part of a family of texture analysis instruments and equipment from Stable Micro Systems. An extensive portfolio of specialist attachments is
available to measure and analyse the textural properties of a huge range of
food products. Our technical experts
can also custom design instrument fixtures according to individual
specifications.No-one understands texture analysis like we do!
To discuss your specific test requirements click here...
 |  |  |


No comments:
Post a Comment