Tuesday, 13 November 2018

Fruit Texture: How to assess skin strength and flesh firmness of whole fruits

Penetration test of avocado sample
Penetration test of avocado
sample using a P/3 Cylinder
Probe and the Circular Support
The measurement of firmness is of paramount importance to know the proper maturity and ripening stage during growth and storage of fruit.

Firmness can be an indicator of immaturity or overmaturity. Excessive peach firmness, for example, can indicate an immature peach with little free juice. Conversely, an overmature, soft peach can be excessively juicy and prone to bruises.


Where individual fruits are to be tested, penetration testing (using a cylinder or ball probe smaller than the fruit) provides a constant surface area for testing which often reduces the variability of results when compared to compression testing data.


Measuring the skin strength and flesh firmness of whole fruit


A penetration test destructively measures firmness by registering the force required for a Cylinder Probe (generally from 2mm – 8mm in diameter), Magness-Taylor Puncture Probe, or Ball Probe, to penetrate the fruit’s flesh to a chosen distance and is frequently used for testing firmness of a wide variety of fruits. Magness-Taylor probes are commonly used, widely accepted in the field of testing of whole fruit and have historically been the reference measure for firmness in many fruits as this method has shown good correlation with consumer acceptability for firmness. With probes of this size and shape the skin will yield once penetrated and the underlying flesh can also be measured.

Penetration testing has the benefit of not requiring samples to be of the same size and does not require sample preparation. However, orientation of the penetration is important as samples of this nature are anisotropic. The depth of penetration varies according to the fruit size and proximity to e.g. pits, cores and it is sometimes possible to perform tests on both sides of each fruit tested e.g. peaches. Some larger berries are commonly penetrated using a small (e.g. 2-3mm) Cylinder Probe and the maximum force taken as the firmness value. 


Penetration test of apple using a Needle Probe
Penetration test of apple
using a Needle Probe
For ease of testing, the fruit is often cut in half and the fruit laid down onto the sample platform cut surface down in order to stabilise the sample for penetration testing of its side. This method may be the only testing option if there is limited availability of sample to test but repeatability may be compromised. To obtain reliable results and reduced variation in this way, special attention should be paid to aspects of size, ripening stage and growing conditions.

This type of test primarily assesses skin strength/toughness and elasticity, yield point and resilience, the ripening and softening profile and the firmness of the underlying flesh. Some researchers prefer to remove a small section of the skin/peel with a razor blade so that penetration can be performed on the flesh only and the test is isolated to the measurement of flesh firmness.


A Penetration Test of Whole Fruit can be applied to:
a: Fruit with pits: where the outer skin covers a soft, fleshy fruit and the fruit surrounds a single, hard stone, or pit, which contains the seed – cherries, apricots, nectarines, peaches, plums, avocado, olives
b: Fruit with cores: where there is a central seed-containing core surrounded by a thick layer of flesh – apples, pears
c: Large fruits without cores: melons – large, juicy fruits with thick skins and many seeds

d: Citrus fruits where a measure of the peel characteristics are required: these possess a thick outer rind and a thin membrane separates the flesh into segments – e.g. oranges, tangerines, grapefruits, kumquats, lemons, limes

e: Starchy fruits: banana – pasty homogeneous starchy fruits with very soft texture; easily mashed to pulp or follow viscous behaviour when squashed

f: Large berries
g: Tropical fruits – papaya, figs, dates, guavas, mangoes, kiwis.


Interpretation of Whole Fruit Penetration Curve
The firmness of ripe and unripe samples can be tested by penetrating a small diameter cylinder probe into the whole fruit (around the equatorial region) and measuring the subsequent force to rupture the skin and further penetrate through the underlying tissue to a chosen distance of e.g. 5mm.

Curves of ripe vs. unripe pears
1: Curves of ripe vs. unripe pears
tested using a 2mm cylinder probe
The probe proceeds to move down onto the fruit and an initial rapid rise in force is observed. During this stage the sample is deforming under the applied force but there is no puncturing of the tissues.

This stage ends abruptly when the probe punctures through the skin and begins to penetrate into the sample flesh, which event is represented by the sudden change in slope called the “yield point” (or “bioyield point”). The yield point (maximum force) occurs when the probe begins to penetrate into the food, causing irreversible damage.

The third phase of the puncture test, namely the plateau of the force after the yield point, is an indication of the underlying flesh firmness of the fruit (1).


2: Penetration force/distance curve
and parameters
Six texture parameters can be calculated from the force-displacement curve (2). The maximum force (Fmax) represents the force required to puncture the fruit skin. Fmax represents the skin strength as is often termed the bioyield point. The probe displacement Dp, expressed in mm, is the value of the probe position at Fmax and indicates the elasticity of the skin.

Stiffness, is the slope of the first part of the curve measured from the beginning of the curve to Fmax. Work of penetration (W1) is the mechanical work needed to reach the rupture point, as is taken as the area under the curve to Fmax. Flesh firmness (Ff) is the average value of the forces measured after skin rupture. W2 is the work measured (area under the curve) after the skin rupture. 


These values can be automatically calculated with the use of a simple macro within Exponent software, making collection of parameters quick and intelligent.

Watch the video below
to see a summary of the types of testing possibilities that are available for the measurement of fruit and vegetable texture to provide quality control tools and ultimately, consumer satisfaction:


View fruit and vegetable video


For more information on how to measure texture, please visit the Texture Analysis Properties section on our website.
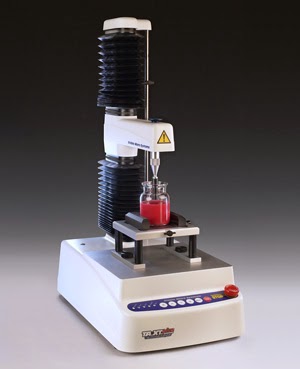
TA.XTplus texture analyser with bloom jar The
TA.XTplus texture analyser is part of a family of texture analysis instruments and equipment from Stable Micro Systems. An extensive portfolio of specialist attachments is available to measure and analyse the textural properties of a huge range of food products. Our technical experts can also custom design instrument fixtures according to individual specifications.

No-one understands texture analysis like we do!

To discuss your specific test requirements, click here...

 Fruit and Vegetable testing videoDownload a published article covering methods for the testing of fruit and vegetables

Browse our range of fruit and vegetable testing solutions

Tuesday, 6 November 2018

Fruit Texture: a world of food development possibilities with fruit / fruit firmness/ripeness

TA.XTExpress texture analyserOnly relatively recently have modern techniques in texture analysis been implemented in the fruit sector.

The embracement of more advanced testing methods and technologies has been led by increased fruit consumption in the consumer sphere, in turn boosted by increased health awareness and a global trend towards healthier living. Historically considered a ‘low value-added’ commodity, agricultural produce such as fruit has failed to attract the same level of investment and sophistication of analysis into the correlations between structural characteristics and consumer acceptability as processed foods have.

Tuesday, 30 October 2018

Biaxial Film Testing using a Texture Analyser – Calculating Fundamental Parameters

Film Support RigThe use of the Film Support Rig can provide a very useful test for monitoring the quality of irregular objects, such as the toughness of sliced meat. However, this test setup can also provide more fundamental stress-strain data if the sample has a known uniform thickness and homogeneous structure.

Sometimes the properties of a thin film are under investigation, but the film might be unsuitable for any other type of testing. An example would be a film of dried nail polish; depending on its properties, this can be too brittle to clamp in tensile grips, it is too thin to test under compression and it may not be large enough for bend testing. In cases such as this, the Film Support Rig is ideal, as the sample is clamped at the edges and put under “biaxial tension” by a spherical probe pushing into the centre. 


Tuesday, 23 October 2018

Contained Compression Testing using a Texture Analyser – Calculating Bulk Modulus

Ottawa CellBulk modulus is a defined as the relative change in a sample’s volume when a unit compressive or tensile stress acts uniformly over its surface. 

It is a measure of how resistant a substance is to pure compression. Its measurement is possible by the use of a Texture Analyser, providing care is taken over the sample setup.

Tuesday, 16 October 2018

The Measurement of Hysteresis using a Texture Analyser

Testing mattressHysteresis in the context of deforming a material is the loss of energy in the form of heat when a sample is loaded then unloaded. 

This occurs due to internal friction, and so the effect is larger for a material such as rubber, which requires the movement of large molecular chains each time it is stretched or compressed. If a piece of rubber is deformed several times in the hands, this loss of energy can be felt directly as the sample heats up. 

As can be seen on the graph, the deformation of a viscoelastic material follows a different path on the load and unload cycles. The unload cycle shows that the material is slower to recover compared to the load cycle. This difference in recovery is known as hysteresis, which is due to energy dissipation by the generation of heat.

Tuesday, 9 October 2018

Compression Testing using a Texture Analyser – Calculating Fundamental Parameters

Squeezing sponges
Compression testing involves a self-supporting sample being compressed under a flat probe large enough to cover the whole sample. 

The loading arm (attached to the probe) moves down at a constant speed to deform the sample, first deforming it elastically then plastically (if it is not completely brittle). If the force required to break the sample is within the limit of the load cell, fracture may occur. However, this is not always the case in compression as many samples are stronger (or tougher) in compression than in tension, especially ceramic samples.

Tuesday, 2 October 2018

Three Point Bend Testing using a Texture Analyser – Calculating Fundamental Parameters

TA.HD plus 3 point bend test on plastic sample

When a customer is presented with an elongated or flat food sample, one of the first things they might do is snap it between their hands. 

During this process, they are subconsciously assessing whether the food product is brittle or ductile, stiff or compliant, and strong or weak. Consequently, bend testing is a technique used very frequently by Texture Analyser users, covering everything from the snap of tablets to the toughness of dog chews. 

The analysis of this type of testing is often limited to looking at a force peak and maybe the distance to fracture. It is a very useful test for monitoring quality of irregular objects. However, this test setup can also provide useful stress-strain data if the sample has a uniform cross-section, providing accurate measurements are made of the sample dimensions. “Flexure” and “bending” have the same meaning and are often used interchangeably.

Tuesday, 25 September 2018

Tensile Testing using a Texture Analyser – Calculating True Stress and True Strain

Texture Analyser film tensile testThe calculation of parameters from the stress-strain graph of a tensile test has already been covered in a previous blog post. 

The calculations considered were those most often used when referring to stress and strain, and to give them their full name they would be called “engineering stress” and “engineering strain”. It is usually safe to assume that every time stress and strain are mentioned in the literature, this refers to the engineering values.
 

However, as the load on a sample increases, the cross-section over which the force is applied changes (it gets thinner). If the engineering stress is used (taking into account the initial area), the stress is underestimated. True stress solves this issue by using the instantaneous area over the course of application of load so that as the cross-section changes, the value of stress is calculated using the new cross-sectional area.
Additionally, whereas engineering strain is the amount that a material deforms per unit length, true strain is the natural log of the current length over the original length.